

ara has just released Xara Photo & Graphic Designer 9, an all purpose photo
editing, graphic design tool that is perfect for new users and professional
designers alike. While XP&G9 lacks some of the high end tools and features of
Designer Pro, XPG9 is attractively priced and has most of the tools and features you will
ever need to create effective website graphics, illustrations, do photo edits, and more.
In this First Look, we’ll look at the new features including the incredible Photo Heal
Tool, the equally new and exciting Mask and Region Tools, plus other new features
and a few of the existing features that I feel are worth revisiting (there are so many
great features, I often rediscover them when I write a new review).
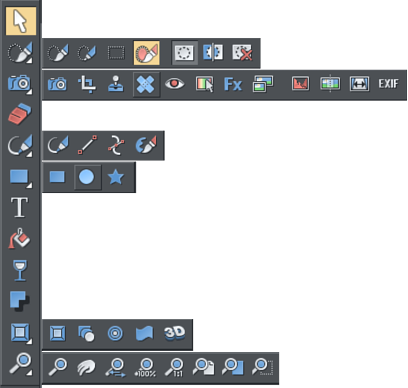
Reconfigured Tool
Bar
The Tool Bar has been reorganized as you can see on the right. Those of you familiar with Xara products will notice a bunch of new tools in the fly out menus, especially the new Mask and Region Tools (the first flyout), a few new additions to the Photo Tool fly out (the X!), and a great new tool in the Line Tools fly out menu. We’ll start with a look at the new Mask and Region Tools.The New Mask and
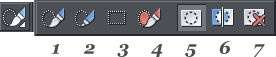
Region Tools
Right below the Selector Tool (the arrow pointer) is the all new Mask and Region Tools fly out menu. Creating a region or a mask lets you isolate an area of a photo or vector object without effecting other areas in the photo or drawing. A region lets you edit within the selection while a mask protects the contents of the selection. The photo edits you make are non-destructive vector shapes, which means you can remove any photo edits by selecting the edited area (hold down the Ctrl key and click) and pressing Delete. Let’s look at the Mask and Region tools and see what they do. 1. Region Painter 2. Freehand Region 3. Rectangle Region The region tools (1-3), allow you to edit within the regional area. The Region Painter works with adjustable size brushes to paint on a region area. The Freehand Region works in the same manner as the Freehand and Brush Tool and has the same Smoothness slider settings. This is good for defining more precise areas. Not surprisingly, the Rectangle Region creates rectangular editing areas. Examples of regions and masks are shown on the right. You can edit within the regions using the Photo Tool, Enhance functions, for example, you can brighten the colors in your region, increase or decrease the saturation, edit the contrast, warm cool balance, etc. 4. The Mask Painter works two ways, if you select this tool, any active regions become a mask. Or you can just paint the mask on directly. As with the Regional Painter, the Mask Painter allows you to adjust the size of the masking brush from about 10 pixels to about 100 pixels. If you hold down the Shift key, the brush (all the mask tools actually) becomes an eraser and subtracts areas from the mask. 5. Show/Hide Mask does exactly that. 6. Invert Simply reverses what is masked and what is protected. 7. Delete Mask or Region removes the mask or region. While these tools are similar, the main difference is a Region is an area into which you can apply enhancements, using the Photo Tool settings. A Mask is an area that is protected from any edits made to the image for example color selection. TIPS: If you hold down the Shift key, the operation switches to erase, so you can add to or remove areas of the mask and regions as you draw. If you hold down the Alt key, you can stretch the operation in a straight line like a rubber band. Release the Alt key at the end of the straight line, then hold it down to start a new straight line. Hold down the Alt key and you can use your scroll wheel on your mouse to increase or decrease the size of the brush.

Various uses for Masks and Regions
A region applied
to a vector group
and edited with the
Photo Tool.
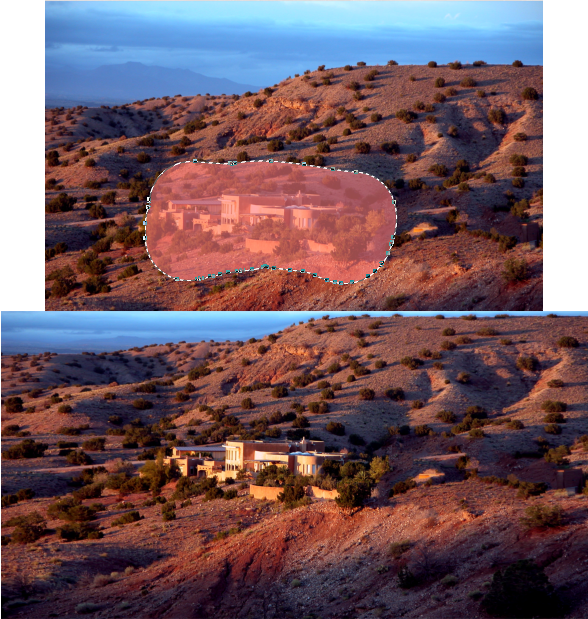
You can also use the Mask Painter Tool to designate parts of a photo to preserve
when you are using the Content Aware Tool (Photo Tool fly out). Content Aware
preserves part of a photo image while extending the areas around it as you can see in
the before and after images above.


Xara Products
Xara Products
Legal & Contact Info
About The Xara Xone
Where content is provided by third parties, the copyright holder is indicated. Trademark notice.